Mr. March Mistler Art + Design
  • Blog
  • Web Design
  • Dig Pub
  • Fashion
  • Photo
  • Graphic Design
  • Fashion 2
  • Student Gallery
  • About

Pinhole Cameras

1/27/2014

1 Comment

 
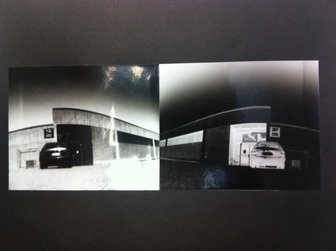
PictureStudent Pinhole Example
Project Description:

A pinhole camera, also known as camera obscura, or "dark chamber", is a simple optical imaging device in the shape of a closed box or chamber. In one of its sides is a small hole which, via the rectilinear (straight lines) propagation of light, creates an image of the outside space on the opposite side of the box. Aristotle wrote about a rudimentary concept of the pinhole camera. Today, photographers continue to use pinhole cameras for artistic purposes. Many pinhole cameras can be bought (even pinhole kits can be purchased), but we are going to make ours from scratch!

Objectives:
  • Study pinhole photography and construct a pinhole camera
  • Study the application of pinhole camera to create a negative image
  • Employ darkroom techniques to develop your prints

Materials:
  • Black tempera paint
  • Oatmeal containers
  • Tin
  • Pin (to poke hole)
  • Black & white photographic paper
  • Mounting tissue
  • Black board

Steps:
  1. Obtain an oatmeal canister
  2. Paint ENTIRE the canister black (inside and outside)
  3. If your box has a clear plastic lid, cut a circle to place on the inside of the lid and paint it black, glue in with elmer’s glue.
  4. Carefully cut out a small box (about 1 in x 1 in) on one side of the oats box. It should be about half way up the container.
  5. I have precut aluminum squares for you
  6. Drill a hole in the aluminum (we will do this together)
  7. Tape the aluminum on the inside of the box with masking tape
  8. Paint the masking tape black
  9. Let it all dry!
  10. In the darkroom, cut a 5x7 piece of paper in half
  11. Scroll a small piece of tape on the back side (non shiny side)
  12. Place the paper inside the pinhole camera so it faces the pinhole.
  13. Go outside (carefully holding the pinhole with your thumb), find a great shot, and take your thumb off of the hole.
  14. Expose for about 10 seconds (depending on the amount of light)
  15. Place the paper through the darkroom chemistry. Now you have a NEGATIVE.
  16. Place the negative face down on top of a new piece of b&w paper.
  17. Expose with white light on the enlarger for 10 seconds.
  18. Dry mount your prints
    1. Prints must be cut evenly and straight
    2. Prints must be centered (use a ruler)
Grading Criteria:
Content
  • Effectiveness in communicating the idea within each design
  • Subject/idea is uniqueInteresting angle/perspective
Composition
  • Quality of positive and negative image?
  • Image is eye catching; has visual impact
  • Uses interesting lines/shapes
  • It is visually balanced
Technical Quality
  • Construction of the pinhole
  • The image is in acceptable focus
  • Images are well exposed/developed
  • No dust, water spots or marks
  • There are no fix stains or tong prints
  • Images are neat and well presented.
Work habits 
  • Working with peers
  • Working with materials
  • Outside behavior
  • Arrives to class on time and fully prepared.
  • Stays on task all period every day of project.
  • Always makes productive use of class time.Always takes the print through the final stage of development, the water wash, and sets prints to dry before leaving the darkroom.
  • Well-organized.
  • Asks questions when help is needed.
  • Re-organizes station. Cleans up thoroughly.

Tips to Get Started:
  • If your image is too dark, decrease the exposure time
  • If your image is too light, increase the exposure time
  • If your image is streaked with gray, check your pinhole camera for light leaks
  • If your image is streaked with black, turn your camera pinhole away from the sun
  • If your image is blurry, make sure your subject and camera do not move during exposure
  • If your image is fuzzy, your pinhole is too large. Make a new pinhole lens or use another camera.

Start timing your exposures using this chart:
  • Bright Sun with Distinct Shadows
    10 Seconds

  • Cloudy and Bright, No Shadows
    15 Seconds

  • Heavy Overcast, Open Shade
    25 Seconds

  • Indoors- Bright
    30 Minutes to 1 Hour

  • Indoors- Average
    1 to 2 Hours

Vocabulary:
  • Pinhole
  • Enlarger
  • Developer
  • Fixer
  • Stop bath
  • Negative
  • Dry mount
  • Camera Obscura (dark chamber)

Resources:
http://www.pinhole.cz/en/pinholecameras/whatis.html


1 Comment
My Blog link
12/22/2021 04:01:18 am


Your blog is very interesting and adds insight for me. Thank you for sharing.

Reply


Leave a Reply.

    Daily Agenda

    Enter your email address for email updates:

    Delivered by FeedBurner

    Photography 

    Photography I is an upperclass course where students learn the basics of photography, including metering, lighting, and composing a dynamic composition within a picture plane. Students will use film and digital.

    Course Expectations

Powered by Create your own unique website with customizable templates.
  • Blog
  • Web Design
  • Dig Pub
  • Fashion
  • Photo
  • Graphic Design
  • Fashion 2
  • Student Gallery
  • About